Journal Pen Holders
I’ll bet you can’t make just one! These journal pen holders are easy, fun, and make great gifts. I have a video for this. Click HERE for the link. Let’s make them!


Step 1: Fuse Interfacing
Fuse one 2.5” x 8” piece of interfacing onto the back of the front 3” x 8.5” piece of fabric following the manufacturer’s directions. Use a piece of parchment paper to protect your iron. Repeat with the back 3” x 8.5” piece of fabric.

Step 2: Making the Pocket
Fold the pocket piece in half, wrong sides together, so the short sides are touching. Press to crease. Open up the pocket piece and add the 2.5” x 5.25” piece of interfacing so the one short edge it at the fold. Center the interfacing so there is 1/4” on every side except of the side at the fold. Refold the piece, sandwiching the interfacing inside of the pocket. Press. Optional: Top Stitch 1/8” from the fold.

Step 3: Baste Pocket to Front
Layer the pocket on top of the right side of the front fabric, lining up the sides and the bottom. Clip together and then baste along the two sides. Make sure to stitch within the 1/4” seam allowance. This is just to hold the pocket in place while assembling the pen holder.
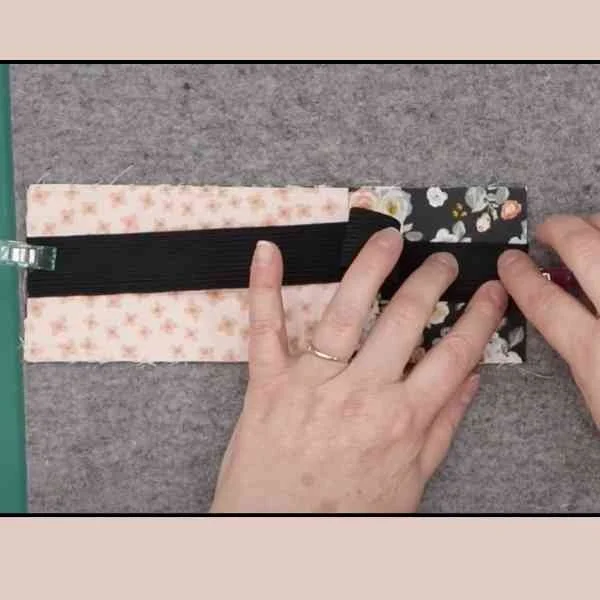
Step 4: Adding Elastic
Next, make the center of the front & pocket unit on the short sides. Starting at one end, center the elastic on to the short side and clip it. Clip the other end of the elastic on the other short side, making sure it is centered. Baste both sides to secure the ends while sewing the unit together.

Step 5: Assembling & Finishing
Place the front, pocket, and elastic unit on a flat surface with the pocket side up. Lay the back piece, right side down, on top of the front unit. Clip all the way around. Mark a place for turning and sew around the edges using a 1/4” seam allowance, making sure to leave an opening for turning.
Next, clip the corners and turn the journal pen holder. Press well. Close the turning opening by stitching closed by hand or machine. Optional: Top stitch around the entire pen holder. Enjoy!
I hope you enjoyed making this project!
Happy Quilting,
Kris